Line level (unamplified) sound from Midway Wolf Unit/UMK3
Categories:
[blog]
Tags:
[arcade],
[modding]
Obtaining unamplified audio from arcade game PCBs is a fairly common goal. The JAMMA standard only allows for amplified mono audio, and if your arcade cabinet is wired up for stereo, chances are it'll have its own amplifier as well, meaning you won't be very interested in the audio available on the JAMMA connector.
Many arcade boards therefore have their own stereo audio outputs, for instance the Capcom CPS2 boards have two RCA jacks for unamplified (line level) stereo output, greatly desirable for people with amplified stereo in their cabinets. Sammy's Atomiswave supports stereo out, however only preamplified - and amplifying already amplified audio is NOT to be advised. Unless you are happy using external devices which convert amplified audio back down to line level, the only option is to modify the hardware. This is often fairly trivial for those handy with a soldering iron, however finding where and what to solder is best left to electronics enthusiasts.
The Midway Wolf Unit board (notably used for Ultimate Mortal Kombat 3 [umk3]) is a board with only amplified mono audio output. I hunted around a lot for information on modifying the board to produce unamplified/line level output, to no avail. Fortunately, it's incredibly easy (and even well labelled!)
Here's a photo with a red box detailing the area of interest:
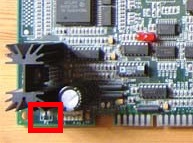
This is the "P2 header" and contains the soldering points necessary for the modification. It's easy to locate - right next to the large heatsink, in the corner of the board. This heatsink is connected to the TDA7240 audio amplifier (if you are interested in more information on this amp, check out the data sheet - which includes a recommended schematic on how to use it in a circuit. I verified this is essentially how it is used on the Wolf Unit boards). The silkscreening exclaiming "LINE OUT" on some boards next to the P2 header is a strong hint, and the proximity to the audio amplifier is good evidence, as well.
"Enough! Onto the details, already!"
Pin 2 of the P2 header is connected to Ground, and Pin 1 is the unamplified mono audio signal, connected to pin 3 of the audio amp through a couple of capacitors.
What you need:
- Audio socket of your choice
- Some wire, probably
- Soldering iron
- A PCB mount RCA socket, very standard for line level audio, is a fine choice.
Unfortunately, the side-by-side nature of the two pins are not the greatest for securely mounting audio sockets to. After removing the solder of both pins on the P2 header, I soldered the Ground pin of the RCA socket into the Pin 2 solder hole. Then I used a small piece of wire to connect the +ve connector on the RCA socket to Pin 1 on the P2 header. Some hot glue helped to more securely fasten the socket to the PCB.
Here are some photos of the finished product, as an example:
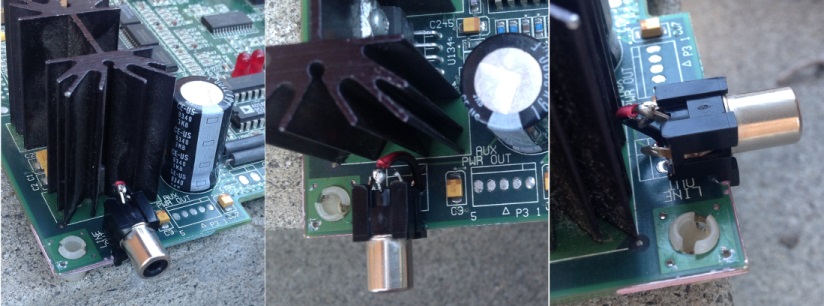
I'm sure other methods of mounting the socket, or other sockets, are possible, but this seemed the most straight-forward to me. It's fairly strongly attached, but could be easily broken off if treated roughly.
Be wary that this particular setup is mono audio only, if you need to hook it up to a stereo amplifier, some form of splitter cable will be required.
Hope this helps, and feel free to ask any questions/share your own pics with me at my twitter!